本文系转载 来自 博客园 本站作了适当编辑和点评
原 文链接
Application
一.介绍
WPF和 传统的WinForm 类似, WPF 同样需要一个 Application 来统领一些全局的行为和操作,并且每个 Domain (应用程序域)中只能有一个 Application 实例存在。和 WinForm 不同的是 WPF Application 默认由两部分组成 : App.xaml 和 App.xaml.cs,这有点类似于 Delphi Form(我对此只是了解,并没有接触过Delphi ),将定义和行为代码相分离。当然,这个和WebForm 也比较类似。XAML 从严格意义上说并不是一个纯粹的 XML 格式文件,它更像是一种 DSL(Domain Specific Language,领域特定语言),它的所有定义都直接映射成某些代码,只是具体的翻译工作交给了编译器完成而已。WPF应用程序由 System.Windows.Application类来进行管理。
二.创建WPF应用程序
创建WPF应用程序有两种方式:
1、Visual Studio和Expression Blend默认的方式,使用App.xaml文件定义启动应用程序
App.xaml文件的内容大致如下所示:

2、可以自已定义类,定义Main方法实现对WPF应用程序的启动
在项目中添加一个类,类的代码如下,在项目选项中,设定此类为启动项。
using System;
using System.Collections.Generic;
using System.Configuration;
using System.Data;
using System.Linq;
using System.Windows;

namespace WPFApplications
{
    /// <summary>
    /// Interaction logic for App.xaml
    /// </summary>
    public partial class App : Application
    {
        [STAThread]
        static void Main()
        {
            // 定义Application对象作为整个应用程序入口
            Application app = new Application();
            // 方法一:调用Run方法,参数为启动的窗体对象 ,也是最常用的方法
            Window2 win = new Window2();
            app.Run(win);

            // 方法二:指定Application对象的MainWindow属性为启动窗体,然后调用无参数的Run方法
            //Window2 win = new Window2();
            //app.MainWindow = win;
            //win.Show();
            // win.Show()是必须的,否则无法显示窗体
            //app.Run();

            // 方法三:通过Url的方式启动
            //app.StartupUri = new Uri("Window2.xaml", UriKind.Relative);
            //app.Run();
        }
    }
}
三、Application应用程序关闭
| |
|
| OnLastWindowClose(默认值): |
最后一个窗体关闭或调用Application对象的Shutdown() 方法时,应用程序关闭。 |
| OnMainWindowClose |
启动窗体关闭或调用Application对象的Shutdown()方法时,应用程序关 闭。(和C#的Windows应用程序的关闭模式比较类似) |
| OnExplicitShutdown |
只有在调用Application对象的Shutdown()方法时,应用程序才会关闭。 |
对关闭选项更改的时候,可以直接在App.xaml中更改:
<Application x:Class="WPFApplications.App"
    xmlns="http://schemas.microsoft.com/winfx/2006/xaml/presentation"
    xmlns:x="http://schemas.microsoft.com/winfx/2006/xaml"
    StartupUri="Window2.xaml"
    ShutdownMode="OnExplicitShutdown">
    <Application.Resources>
    </Application.Resources>
</Application>
同样你也可以在代码文件(App.xaml.cs)中进行更改,但必须注意这个设置写在app.Run()方法之前 ,如下代码:
app.ShutdownMode = ShutdownMode.OnExplicitShutdown;
app.Run(win);
四、Application对象的事件
|
名称
|
描述
|
|
Activated
|
当应用程序成为前台应用程序时发生,即获取焦点。
|
|
Deactivated
|
当应用程序停止作为前台应用程序时发生,即失去焦点。
|
|
DispatcherUnhandledException
|
在异常由应用程序引发但未进行处理时发生。
|
|
Exit
|
正好在应用程序关闭之前发生,且无法取消。
|
|
FragmentNavigation
|
当应用程序中的导航器开始导航至某个内容片断时发生,如果所需片段位于当前内容中,则导航会立即发生;或者,如果所需片段位于不同 内容中,则导航会在加载了源 XAML 内容之后发生。
|
|
LoadCompleted
|
在已经加载、分析并开始呈现应用程序中的导航器导航到的内容时发生。
|
|
Navigated
|
在已经找到应用程序中的导航器要导航到的内容时发生,尽管此时该内容可能尚未完成加载。
|
|
Navigating
|
在应用程序中的导航器请求新导航时发生。
|
|
NavigationFailed
|
在应用程序中的导航器在导航到所请求内容时出现错误的情况下发生。
|
|
NavigationProgress
|
在由应用程序中的导航器管理的下载过程中定期发生,以提供导航进度信息。
|
|
NavigationStopped
|
在调用应用程序中的导航器的 StopLoading 方法时发生,或者当导航器在当前导航正在进行期间请求了一个新导航时发生(没大用到)。
|
|
SessionEnding
|
在用户通过注销或关闭操作系统而结束 Windows 会话时发生。
|
|
Startup
|
在调用 Application 对象的 Run 方法时发生。
|
应用程序的事件处理可以:
1、在App.xaml中做事件的绑定,在App.xaml.cs文件中添加事件的处理方法
在App.xaml文件中:
<Application x:Class="WPFApplications.App"
    xmlns="http://schemas.microsoft.com/winfx/2006/xaml/presentation"
    xmlns:x="http://schemas.microsoft.com/winfx/2006/xaml"
    StartupUri="Window1.xaml"
    Startup="Application_Startup"
    Exit="Application_Exit"
    DispatcherUnhandledException="Application_DispatcherUnhandledException">
    <Application.Resources>

    </Application.Resources>
</Application>
在App.xaml.cs文件中:
public partial class App : Application
{
    [STAThread]
    static void Main()
    {
        // 定义Application对象作为整个应用程序入口
          Application app = new Application();
        // 方法一:调用Run方法,参数为启动的窗体对象 ,也是最常用的方法
          Window2 win = new Window2();
        app.Run(win);
    }

    private void Application_DispatcherUnhandledException(object sender, System.Windows.Threading.
DispatcherUnhandledExceptionEventArgs e)
    {
    }

    private void Application_Exit(object sender, ExitEventArgs e)
    {
    }
}
2、在自定义的类中可以做正常的C#的事件绑定:
public partial class App : Application
{
    [STAThread]
    static void Main()
    {
        // 定义Application对象作为整个应用程序入口
          Application app = new Application();
        // 调用Run方法,参数为启动的窗体对象 ,也是最常用的方法
          Window2 win = new Window2();
        app.Startup += new StartupEventHandler(app_Startup);
        app.DispatcherUnhandledException += new System.Windows.Threading.
DispatcherUnhandledExceptionEventHandler(app_DispatcherUnhandledException);
        app.Run(win);
    }

    static void app_DispatcherUnhandledException(object sender, System.Windows.Threading.
           DispatcherUnhandledExceptionEventArgs e)
    {
        throw new NotImplementedException();
    }

    static void app_Startup(object sender, StartupEventArgs e)
    {
        throw new NotImplementedException();
    }
}
如果通过XAML启动窗体的话,也会编译成为为如下的程序,默认路径为Debug文件夹得App.g.cs文件:
public partial class App : System.Windows.Application {

    /// <summary>
    /// InitializeComponent
    /// </summary>
    [System.Diagnostics.DebuggerNonUserCodeAttribute()]
    public void InitializeComponent() {

        #line 4 "..\..\App.xaml"
        this.StartupUri = new System.Uri("Window5.xaml", System.UriKind.Relative);

        #line default
        #line hidden
    }

    /// <summary>
    /// Application Entry Point.
    /// </summary>
    [System.STAThreadAttribute()]
    [System.Diagnostics.DebuggerNonUserCodeAttribute()]
    public static void Main() {
        WPFApplications.App app = new WPFApplications.App();
        app.InitializeComponent();
        app.Run();
    }
}
五、WPF应用程序生存周期

当然这幅图也只是简单的概括了WPF的执行顺序和生命周期,具体还要细致研究才是。
窗体类基本概念
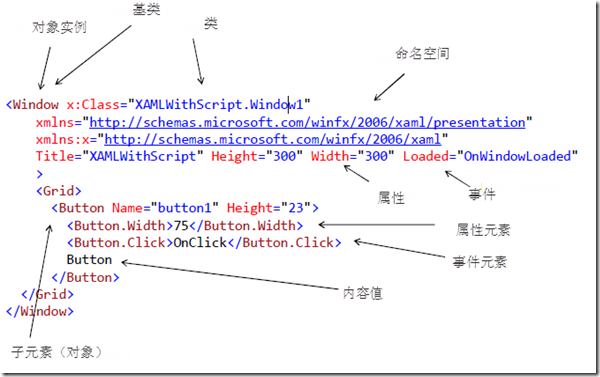
对于WPF应用程序,在Visual Studio和Expression Blend中,自定义的窗体均继承System.Windows.Window类.大家都可能听说过或者看过Applications = Code + Markup: A Guide to the Microsoft Windows Presentation Foundation这本书,它里面就是用XAML和后台代码两种形式来实现同一个功能,那么我们这里定义的窗体也由两部分组成:
1、 XAML文件,在这里面通常全部写UI的东西(希望大家还记得这两幅图)

2、后台代码文件
namespace WPFApplications
{
    /// <summary>
    /// Interaction logic for Window5.xaml
    /// </summary>
    public partial class Window5 : Window
    {
        public Window5()
        {
            InitializeComponent();
        }

        private void btnOK_Click(object sender, RoutedEventArgs e)
        {
            lblHello.Content = "Hello World Changed";
        }
    }
}
也可以将后台代码放在XAML文件中,上面的例子可以改写为:
<Window x:Class="WPFApplications.Window5"
    xmlns="http://schemas.microsoft.com/winfx/2006/xaml/presentation"
    xmlns:x="http://schemas.microsoft.com/winfx/2006/xaml"
    Title="Window5" Height="300" Width="300">
    <StackPanel>
        <Label x:Name="lblHello">Hello,World!</Label>
        <Button x:Name="btnOK" Width="88" Height="22" Content="Click"
               Click="btnOK_Click"/>
        <x:Code>
            <![CDATA[
            void btnOK_Click(object sender, System.Windows.RoutedEventArgs e)
            {
            lblHello.Content = "Hello World Changed";
            }
            ]]>
        </x:Code>
    </StackPanel>
</Window>
二、窗体的生命周期
1、显示窗体
- 构造函数
- Show()、ShowDialog()方法:Show()方法显示非模态窗口,ShowDialog()方法显示模态窗口,这个基本和 WinForm类似
- Loaded事件:窗体第一次Show()或ShowDialog()时引发的事件,通常在此事件中加载窗体的初始化数据,但如果用了MVVM模 式,基本就不在这里面写。
2、关闭窗体
- Close()方法:关闭窗体,并释放窗体的资源
- Closing事件、Closed事件:关闭时、关闭后引发的事件,通常在Closing事件中提示用户是否退出等信息。
3、窗体的激活
- Activate()方法:激活窗体
- Activated、Deactivated事件:当窗体激动、失去焦点时引发的事件
4、窗体的生命周期

为了证实上面的结论,我们用下面的代码进行测试:
public partial class Window3 : Window
  {
      public Window3()
      {
          this.Activated += new EventHandler(Window1_Activated);
          this.Closing += new System.ComponentModel.CancelEventHandler(Window1_Closing);
          this.ContentRendered += new EventHandler(Window1_ContentRendered);
          this.Deactivated += new EventHandler(Window1_Deactivated);
          this.Loaded += new RoutedEventHandler(Window1_Loaded);
          this.Closed += new EventHandler(Window1_Closed);
          this.Unloaded += new RoutedEventHandler(Window1_Unloaded);
          this.SourceInitialized += new EventHandler(Window1_SourceInitialized);

          InitializeComponent();
      }


      void Window1_Unloaded(object sender, RoutedEventArgs e)
      {
          Debug.WriteLine("Unloaded");
      }

      void Window1_SourceInitialized(object sender, EventArgs e)
      {
          Debug.WriteLine("SourceInitialized");
      }

      void Window1_Loaded(object sender, RoutedEventArgs e)
      {
          Debug.WriteLine("Loaded");
      }

      void Window1_Deactivated(object sender, EventArgs e)
      {
          Debug.WriteLine("Deactivated");
      }

      void Window1_ContentRendered(object sender, EventArgs e)
      {
          Debug.WriteLine("ContentRendered");
      }

      void Window1_Closing(object sender, System.ComponentModel.CancelEventArgs e)
      {
          Debug.WriteLine("Closing");
          MessageBoxResult dr = MessageBox.Show("Cancel the window?",
 "Answer", MessageBoxButton.YesNo, MessageBoxImage.Question);
          if (dr == MessageBoxResult.No)
          {
              e.Cancel = true;
          }
      }

      void Window1_Closed(object sender, EventArgs e)
      {
          Debug.WriteLine("Closed");
      }

      void Window1_Activated(object sender, EventArgs e)
      {
          Debug.WriteLine("Activated");
      }

  }
执行结果为:

WPF窗体的详细的属性、方法、事件请参考MSDN,有很多的属性、方法、事件与Windows应用程序中 System.Windows.Forms.Form类颇为相似,其中常用的一些属性、方法、事件有:
- 窗体边框模式(WindowStyle属性)和是否允许更改窗体大小(ResizeMode属性) 。
- 窗体启动位置(WindowStartupLocation属性)和启动状态(WindowState属性) 等。
- 窗体标题(Title属性)及图标 。
- 是否显示在任务栏(ShowInTaskbar)
- 始终在最前(TopMost属性)
Dispatcher及多线程
到这个UI和后台线程交互这个问题,大家都可能在WinForm中遇到过,记得几年前我参加一个外资企业的面试,公司的其中一道题就是说在 WinForm 中如何使用后台线程来操作UI,所以对这个问题比较记忆犹新。
WPF线程分配系统提供一个Dispatcher属性、VerifyAccess 和 CheckAccess 方法来操作线程。线程分配系统位于所有 WPF 类中基类,大部分WPF 元素都派生于此类,如下图的Dispatcher类:

WPF 应用程序启动后,会有两个线程:
- 一个是用来处理UI呈现(处理UI的请求,比如输入和展现等操作)。
- 一个用来管理 UI的 (对UI元素及整个UI进行管理)。
与 Dispatcher 调度对象想对应的就是 DispatcherObject,在 WPF 中绝大部分控件都继承自 DispatcherObject,甚至包括 Application。这些继承自 DispatcherObject 的对象具有线程关联特征,也就意味着只有创建这些对象实例,且包含了 Dispatcher 的线程(通常指默认 UI 线程)才能直接对其进行更新操作。

当我们尝试从一个非 UI 线程更新一个UI元素,会看到如下的异常错误。
XAML代码:
<Window x:Class="WPFApplications.Window2"
    xmlns="http://schemas.microsoft.com/winfx/2006/xaml/presentation"
    xmlns:x="http://schemas.microsoft.com/winfx/2006/xaml"
    Title="Window2" Height="300" Width="300">
    <StackPanel>
        <Label x:Name="lblHello">Hello,World!</Label>
    </StackPanel>
</Window>
后台代码:
public partial class Window2 : Window
{
    public Window2()
    {
        InitializeComponent();
        Thread thread = new Thread(ModifyUI);
        thread.Start();
    }

    private void ModifyUI()
    {
        // 模拟一些工作正在进行
        Thread.Sleep(TimeSpan.FromSeconds(5));
        lblHello.Content = "Hello,Dispatcher";
    }
}

错误截图:

按照 DispatcherObject 的限制原则,我们改用 Window.Dispatcher.Invoke() 即可顺利完成这个更新操作。
private void ModifyUINew()
{
    // 模拟一些工作正在进行
    Thread.Sleep(TimeSpan.FromSeconds(5));
    this.Dispatcher.BeginInvoke(DispatcherPriority.Normal,(ThreadStart)delegate()
    {
        lblHello.Content = "Hello,Dispatcher";
    });
}
如果在其他工程或者类中,我们可以用 Application.Current.Dispatcher.Invoke方法来完成同样的操作,它们都指向 UI Thread Dispatcher这个唯一的对象。
Dispatcher 同时还支持 BeginInvoke 异步调用,如下代码:
private void btnHello_Click(object sender, RoutedEventArgs e)
{
    new Thread(() =>
    {
        Application.Current.Dispatcher.BeginInvoke(DispatcherPriority.Normal,
            new Action(() =>
            {
                Thread.Sleep(TimeSpan.FromSeconds(5));
                this.lblHello.Content = DateTime.Now.ToString();
            }));
    }).Start();
}
关于Dispatcher和WPF多线程, 还有很多要讲,由于篇幅有限且精力有限,我这里只讲一些我们最常见的应用,同时包括Freezable 的处理等问题,大家可以查阅MSDN或者查阅国外相关的专题。
类继承结构
在WPF中常用的的控件类继承结构如下图所示(图中圆圈的表示抽象类,方框的表示实体类):

- System.Object 类:大家都知道在.Net中所有类型的根类型,在图中没有画出来,DispatcherObject 就继承于它,所以它是整个应用系统的基类。
- System.Windows.Threading.DispatcherObject 类:WPF 中的绝大多数对象是从 DispatcherObject 派生的,它提供了用于处理并发和线程的基本构造。WPF 是基于调度程序实现的消息系统。
- System.Windows.DependencyObject类:WPF基本所有的控件都实现了依赖属性,它表示一个参与依赖项属性系统的对 象。
- System.Windows.Media.Visual类:为 WPF 中的呈现提供支持,其中包括命中测试、坐标转换和边界框计算等。
- System.Windows.UIElement 类:UIElement 是 WPF 核心级实现的基类,该类建立在 Windows Presentation Foundation (WPF) 元素和基本表示特征基础上。
- System.Windows.FrameworkElement类:为 Windows Presentation Foundation (WPF) 元素提供 WPF 框架级属性集、事件集和方法集。此类表示附带的 WPF 框架级实现,它是基于由UIElement定义的 WPF 核心级 API 构建的。
- System.Windows.Controls.Control 类:表示 用户界面 (UI) 元素的基类,这些元素使用 ControlTemplate 来定义其外观。
- System.Windows.Controls.ContentControl类:表示包含单项内容的控件。
- System.Windows.Controls.ItemsControl 类:表示一个可用于呈现项的集合的控件。
-
- System.Windows.Controls.Panel类:为所有 Panel 元素(布局)提供基类。使用 Panel 元素在 Windows Presentation Foundation (WPF) 应用程序中放置和排列子对象。
- System.Windows.Sharps.Sharp类:为 Ellipse、Polygon 和 Rectangle 之类的形状元素提供基类。
除了上面的图以外,还有几个命名空间也很重要,如下:
-
- System.Windows.Controls.Decorator 类:提供在单个子元素(如 Border 或 Viewbox)上或周围应用效果的元素的基类。
- System.Windows.Controls.Image 类:表示显示图像的控件。
- System.Windows.Controls.MediaElement类:表示包含音频和 /或视频的控件。
WPF的逻辑树和视觉树
关于这部分的内容讲起来就比较多了,正如上次大家的留言里说的一样,这个内容如果拉开来讲肯定就要开几个篇幅,所以我们今天主要以讲清楚概念为重 点,先看下面的一个XAML代码的例子:
<Window x:Class="WPFApplications.Window1"
    xmlns="http://schemas.microsoft.com/winfx/2006/xaml/presentation"
    xmlns:x="http://schemas.microsoft.com/winfx/2006/xaml"
    Title="Window1" Height="300" Width="300">
    <StackPanel>
        <Label>Hello,World!</Label>
    </StackPanel>
</Window>
上面这个UI非常的简单,Window是一个根结点,它有一个子结点StackPanel,StackPanel有一个子结点Label。注意 Label下还有一个子结点string(LabelText),它同时也是一个叶子结点。这就构成了窗口的一个逻辑树。逻辑树始终存在于WPF的UI 中,不管UI是用XAML编写还是用代码编写。WPF的每个方面(属性、事件、资源等等)都是依赖于逻辑树的。
视觉树基本上是逻辑树的一种扩展。逻辑树的每个结点都被分解为它们的核心视觉组件。逻辑树的结点对我们来说是不可见的。而视觉树不同,它暴露了视觉 的实现细节。下面是Visual Tree结构就表示了上面四行XAML代码的视觉树结构(下面这幅图片来源于WPF揭秘):

当然并不是所有的逻辑树结点都可以扩展为视觉树结点。只有从 System.Windows.Media.Visual或者System.Windows.Media.Visual3D继承的元素才能被视觉树所包 含。其他的元素不能包含是因为它们本身没有自己的提交(Rendering)行为。在Windows Vista SDK Tools当中的XamlPad提供查看Visual Tree的功能。需要注意的是XamlPad目前只能查看以Page为根元素,并且去掉了SizeToContent属性的XAML文档。如下图所示:
在visual studio的命令行中输入xamlpad就可以进入如下的界面:


通过上图我们可以看到Visual Tree确实比较复杂,其中还包含有很多的不可见元素,比如ContentPresenter等。Visual Tree虽然复杂,但是在一般情况下,我们不需要过多地关注它。我们在从根本上改变控件的风格、外观时,需要注意Visual Tree的使用,因为在这种情况下我们通常会改变控件的视觉逻辑。 比如我们在自己写一些控件的时候,再比如我们对某些外观进行特别订制的时候。
WPF 中还提供了遍历逻辑树和视觉树的辅助类:System.Windows.LogicalTreeHelper和 System.Windows.Media.VisualTreeHelper。注意遍历的位置,逻辑树可以在类的构造函数中遍历。但是,视觉树必须在经 过至少一次的布局后才能形成。所以它不能在构造函数遍历。通常是在OnContentRendered进行,这个函数为在布局发生后被调用。
其 实每个Tree结点元素本身也包含了遍历的方法。比如,Visual类包含了三个保护成员方法VisualParent、 VisualChildrenCount、GetVisualChild。通过它们可以访问Visual的父元素和子元素。而对于 FrameworkElement,它通常定义了一个公共的Parent属性表示其逻辑父元素。特定的FrameworkElement子类用不同的方式 暴露了它的逻辑子元素。比如部分子元素是Children Collection,有是有时Content属性,Content属性强制元素只能有一个逻辑子元素。
为了弄清楚这些概念,我们就通过如下代码作为演示:
public partial class Window1 : Window
{
    public Window1()
    {
        InitializeComponent();
        PrintLogicalTree(0, this);
    }

    protected override void OnContentRendered(EventArgs e)
    {
        base.OnContentRendered(e);
        PrintVisualTree(0, this);
    }

    void PrintLogicalTree(int depth, object obj)
    {
        // 打印空格,方便查看
        Debug.WriteLine(new string(' ', depth) + obj);

        //  如果不是DependencyObject,如string等类型
        if (!(obj is DependencyObject)) return;

        //  递归打印逻辑树
        foreach (object child in LogicalTreeHelper.GetChildren(
            obj as DependencyObject))
        {
            PrintLogicalTree(depth + 1, child);
        }
    }

    void PrintVisualTree(int depth, DependencyObject obj)
    {
        //打印空格,方便查看
        Debug.WriteLine(new string(' ', depth) + obj);

        //  递归打印视觉树
        for (int i = 0; i < VisualTreeHelper.GetChildrenCount(obj); i++)
        {
            PrintVisualTree(depth + 1, VisualTreeHelper.GetChild(obj, i));
        }
    }
}
结果为:

篇主要对Application、window、多线程、类继承结构、逻辑树与可视树等的理论和实际Demo进行了探讨,通过这一篇文章,我们可以大概了 解WPF在这些元素上的处理,同时也给我后面的内容奠定了基础,后面会逐渐牵涉到实际的一些案例和新的概念,所以如果有不熟悉且对这个专题感兴趣的朋友可 以仔细看一下这篇文章,在文章后面也会把本文用到的代码附加上去,大家可以下载下来进行测试。
慧都点评:
正如本文作者讲述的一样,随着电脑硬件设备的高速更新,特别是图形处理系统GPU的飞速发展,硬件系统已经不再成为制约软件性能的主要因素,越来越 多的软件开发商开始选择WPF,越来越多的用WPF开发的效果绚丽,超强的用户体验,简单便捷部署方式的软件应用到生活和工作中。
与此同时各大控件开发商也在WPF开发方面推出自己的WPF控件,下面就为大家推荐几款非常棒的WPF的控件。
1、最早,最有名气的当属美国ActiproSoftware公司出品的:WPF Studio WPF studio 包含12个WPF子控件,囊括了,图表,条码,表格,编辑器,预览,元素库等等WPF开发中最有用的控件。根据慧都控件网测试和客户反馈来看,WPF Studio是功能最强大,效果最好的WPF控件。
2、传统WinForm老大,DevExpress 开始发力,在最新版的DEV2010中同步推出DXperience™ WPF Subscription 控件包,包括了表格、图表、工具条、打印输出、数据编辑、导航面板、页面布局等10个子控件,以DevExpress的业界老大的实力,这款DXperience™ WPF Subscription 绝对是性价比和功能强大的象征。
3、来自加拿大的ComponentArt公司,同样在2010推出控件套包 WIN.UI FOR WPF 包含16个功能子控件,

功能十分强大,加上其比较便宜的价格,性价比尤其突出。
4、ComponentOne公司的 ComponentOne Studio for WPF 2010 v1 ,套包中包含21个功能子控件,除了包含常见的图表,报表,编辑器,工具条等,甚至包含了媒体播放器,颜色编辑器等等特别功能。ComponentOne 更新比较快,从其Rodemap看,其2010 V2版本,将新增日历,地图,停靠面板等新功能。因此它适合功能需求全面的用户,价格相对偏高,适合大中型软件企业。
(慧都控件网版权所有,转载请注明出处,否则追究法律责任)
标签:
本站文章除注明转载外,均为本站原创或翻译。欢迎任何形式的转载,但请务必注明出处、不得修改原文相关链接,如果存在内容上的异议请邮件反馈至chenjj@evget.com
文章转载自:博客园

 首页
首页 














 75次
75次
 相关文章
相关文章 

 在线咨询
在线咨询


 渝公网安备
50010702500608号

 客服热线
客服热线